Thursday, December 26, 2013

It's not over 'til it's over! Continuing on....


I have to admit that this Christmas I was more laid back than usual...maybe it's my age, perhaps the empty nest syndrome, of course it could be that I have gotten smarter and learned to deal with stress better...(not likely)...but anyhooo...I did enjoy the day. I didn't get all my Christmas cards written, but I feel like if I get them out before January 1st, then I am doing well. 

Our challenge this month has been "the HOLIDAYS in a Hurry" and...no one said which holiday, so if you are joining us before the 1st just pick one and tell us how you create to make it happen more efficiently for you. Click HERE to see how to link up with the linky tool below and you will be in business. 


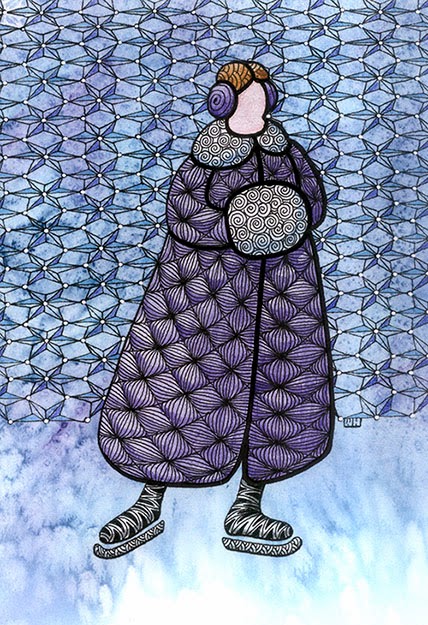
Original artwork with more of a bluish cast...warmer.
This card is the one that has been the easiest for me to achieve. Why? Because Wayne did the artwork. This is ZIA, Zentangle Inspired Art, and once he finished the piece we actually scanned it and color copied it...(mega-copies). However, I wanted it to be hand created too, so I insisted on paste-embossing the Merry Christmas stencil (LS92) onto a tag using the Glossy Blue Embossing Paste (DGBP) and sprinkling it with purple glitter. I then embellished it with a May Arts Ribbon and tied the card closed. One issue with color copies is the difficulty of getting the color to look like the original. This one was more blue when he began, but he went with the flow and tweaked it to be more purple. Otherwise the colors were going a warm gray direction. Because we wanted it to look cold we saturated the colors and found that it needed to be more purple to get that warm coloration removed.

The background was done first on 140 pound hot press watercolor paper. Wet the paper, then put washes of blue and purple watercolors down with a giant brush. Then sprinkle with kosher salt (this salt has more chunky type of crystals). After this was dry, he brushed off the salt. He enlarged the lady ice skater image (LL577) and traced her on top of the spectacular background.  Then he filled in this outline with gouache. Once everything was dry he tangled inside the image, gave her face just a hint of flesh-tone watercolor using a brush and there she is. By the way this could be a New Year's card or a thank you or a happy birthday or...any type of winter missive.

Now I know some of the team are vacationing, but if you get the chance be sure to see what they have in store for you as New Year's is just around the corner. And leave a comment or two to encourage their creative endeavors.


Thursday, December 19, 2013

Trying to get it done in a hurry? Then Power Paste the Molten Magic Technique

This month it is the old flurry scurry get it done in a hurry! But that doesn't mean it has to look simple and wimpy...nope, not at all. My all time favorite fast technique is power pasting with the Molten Magic technique.

Molten Magic is a simple technique that requires sprinkling the Metallic F/X mica powders onto wet embossing paste. Then I tap off the excess powder into the trash bin and heat the paste while it is still wet with a hot heat gun. This bubbles the paste and very quickly dries it at the same time....so the results are immediate. The card you see here actually got too hot while I was bubbling the paste, however the haziness actually ended up looking like the ornaments are glowing....see a feature instead of a problem.

The "POWER PASTING" technique adds to these fast results. Usually if I am using a stencil that has small holes like this Shell Christmas tree (LJ898) I can only paste three or maybe (at the most) four at a time before the holes start filling up with paste. However wide open designs can often be pasted as much as 8 times before you have to change the paste. This really helps get multiples done quickly.


A couple of the cards got singed, but it turned out to be a feature. 
Last week design team member, Louise Healy, described the process beautifully. She blogged all about "holidays in a hurry and power pasting". This wonderful posting was so detailed that I am sharing her description with you. Just click HERE to discover how she accomplishes this technique. I also have a DVD on Embossing Paste Techniques that shows the process. If you are someone that is more visual I highly recommend this DVD.


NOW....after sprinkling the wet paste with the Metallic F/X and the card is heated and the paste is bubbled I take a dry Swiffer dusting cloth and gently wipe the excess Metallic F/X powder off of the background of the design. Here is a list of the colors I used:

1. Pink Poppy
2. Goldfinch
3. Wedgewood
4. Sapphire
5. Glacier Lake
6. Kiwi

The embossing paste used on the aqua paper was the Metallic Gold Embossing Paste (DGP) and the paste used on the dark blue paper was the Pearlescent Embossing Paste (DPP). So you can see that this technique can be done on several of the glossy styles of embossing paste.


May Arts Ribbons are beautiful embellishments

The paper that I used as my base cardstock is a metallic golden yellow. I have discovered that this is not the best stock to use to sprinkle the Metallic F/X onto because the Swiffer just doesn't clean off the excess from glossy or metallic cardstocks. So I use these type of papers for the main card instead. I did the same process for the Season's Greetings stencil (LS91)....I power pasted and did the Molten Magic technique  as well. Then I used a variety of May Arts ribbons to embellish my cards for the finishing touch. 

Now if you would like a detailed pdf of the Molten Magic Technique you can email me for it: lynell@dreamweaverstencils.com

I know some of you are super busy...but I certainly want to thank those of you who have taken the time to play along with our "holidays in a hurry" challenge this month. Please feel free to do so again...we have a couple more weeks to go. If you need more information on how to link up with the linky tool click HERE. This month I will again choose two random winners instead of only one. Remember Pam Hornschu also does a banner every Monday on the Dreamweaver Stencils Facebook page and you could comment to randomly win a stencil there each week.  A special thank you to FitKitty who allowed me to CASE her card for my posting last week. It also allowed me to get several Christmas cards in the mail early. Don't forget to take the time and follow the list of our Dream it UP team listed below. See what they are accomplishing in a hurry this month...they have loads of beautiful ideas. Leaving them some comments encourages them to keep creating with Dreamweaver Stencils.


Thursday, December 12, 2013

CASE when you are doing "Holidays in a Hurry"


LG652 Church with LJ819Snowflakes in the background
This month we are doing a challenge that is dear to my heart: Holidays in a Hurry! Yesterday I was visiting the links of those of you have joined the challenge and noticed that FitKitty had done a set of Christmas cards with creating for the busy crafter in mind. They were simple yet elegant, so I emailed her to ask her permission to CASE her cards using stencils instead. She graciously wrote back to say she would "be delighted" for us to do so and looked forward to seeing the CASE'd creations. By the way, CASE stands for "Copy And Say Everything"...which means you are copying the concept or design format, giving credit and telling how you achieved your results. Please, if you have time, follow the link to her blog (HERE) to see what I  CASEd and leave a comment (or two if you are not in too much of a flurry scurry this season). The technique is different of course, because she printed her images but the end result is very similar. Her image is colored and the background is white, whereas my background is colored and the image is white. Her background papers were done with a folder and mine were done with metal stencils.

STEP ONE: The color process

The technique for the color portion is an easy one that we refer to as "Letterpress". Click HERE if you would like to see the step-by-step tutorial that I did to show you how to achieve this simple way to add the color you see behind the embossed white images. You will need just a few items and tools... cardstock to emboss, your favorite embossing machine, Memories Mists sprays, a rubber embossing mat and of course Dreamweaver metal stencils. After spraying the stencil with Memories Mists ink and putting it through the embossing machine with the appropriate stacking method you will want to let it dry a few minutes. Next I daubed a small amount of Glossy White Embossing Paste (DGWP) onto the scene and sprinkled it with glitter right away while the paste is still wet. To speed up the drying process I have an electric pancake griddle that I put on a low heat setting and the pastes dry in half the amount of time.

STEP TWO: The background embossed papers


LJ891Holly Swirls stencil embossed through an embossing machine

I know it looks like the background card on the left was done with an embossing folder. But it was actually done with a metal stencil. How? Listen closely so you don't ruin your stencils. You want the stencil to be protected from the rollers of the embossing machine...so the stencil sandwich you are creating is the key to success. It is quite simple if you follow this stacking method for your embossing machine. Start with the thick white plate, then place the stencil face down (this means the side that has the copyright and product code imprinted on it) onto the thick white plate. Now spritz the back of your cardstock with rubbing alcohol and place it face down onto the stencil. Hold it gently in place while you set the thick Stamping Details Rubber Mat onto the cardstock and slide your hand off the stencil as you do so. Last in this sandwich you will place two acrylic plates on top of the rubber mat. If you are using a Big Shot you will let the tabs from the thick white platform trail behind as you run it through the machine with the two acrylic plates. If you are using a Cuttlebug you will use two "B" plates. Whatever machine you use, remember ....DO NOT force the machine. The stack should go through firmly...if it slides through too easily you need to add some "shims" in the form of a piece or two of extra cardstock on top of the rubber mat or perhaps a piece of thin chipboard...just start small and add more as needed.

STEP THREE: Putting it together

Mount the colored card from step one onto the embossed card from step two using foam tape and violá you have a very quick and easy card. This is so fast, fun and simple to do. Plus I love the classic monochromatic colorways. Thank you for the inspiration Ms. Fit Kitty

Here are some other cards done with the same technique:


LG676 French Horn stencil with LJ891 Holly Swirls background stencil

LG653 Mountain scene stencil with LJ819 Snowflake background stencil


LG677 Season's Greeting with holly stencil LJ891 Holly Swirls background stencil

So if are in a hurry and would like to do some last minute cards for a gift or to send to those on your Christmas card list....consider this fast yet elegant technique. We hope you'll take a few minutes out of your busy holiday schedule to visit not only Ms. Fit Kitty but the Dream it UP team listed below. Don't forget to link up below and join our "Holidays in a Hurry" challenge this month. If you need to know more about how to link, click HERE for more information.


Thursday, December 5, 2013

The Holidays in a Hurry! And...we have two winners!


Today is the beginning of our December Challenge...which happens to be "the Holidays in a Hurry", this of course is the story of my life, always in a hurry. Whenever December arrives I am often (not always) one step behind, but I figure a big percentage of friends and family are the same, so I don't sweat the small stuff and just immerse myself in this season of joy. I do enjoy making my own Christmas cards, tags and sometimes I even get creative with creating my own wrapping paper. So if you would like to share some of the things you create in a hurry then this upcoming challenge will be right up your alley and we would love to have you join us. Remember that the challenge should reflect a creation that you would do if you are in a hurry. If you are not sure how it all works then click HERE to find out how to link up with the linky tool below and we will enjoy seeing your posts for this month's challenge. 

I also want to say a special thank you to Linda Neff for being our guest designer this past month...such wonderful creations Linda!!!

This month I chose TWO winners! YUP...couldn't resist the fun of sending out two stencils. I know how wild it gets with the holidays I decided to reward more of you for joining us. THANK YOU!!! So our winners are: FitKitty and Shell B...if you would be so kind as to email me your snail mail addys and your favorite stencil choice I will pop your winning in the mail post haste! lynell@dreamweaverstencils.com

My post today is my favorite "in a hurry technique", which is called Molten Magic. Wish I could say that I created this card, but alas I am still running behind. So today's beauty is done by none other than former design team member, Ms. Georgia Sommers. Thank you for sharing this with me, ms. Georgia. The Christmas border stencil (LJ922) is paste-embossed onto black cardstock and the Merry Winter stencil (LM252) was paste-embossed onto dark blue cardstock with the Pearlescent Embossing Paste (DPP). As soon as the stencil is pasted and the stencil removed the Metallic F/X powders are sprinkled onto the wet paste. Georgia used the following Metallic F/X colors: Kimono Red, Kiwi, Gold Dust and Navajo Sky. OH...SOOOO pretty! Now tap off the excess powder and immediately heat the entire card with a heat gun...don't use a whimpy heat gun, use something like a Marvy/Uchida or Milwaukee that gets quite hot. The paste will bubble and look very molten. If it isn't bubbly molten looking, then one of two things is the problem, you are either not holding the heat tool close enough or the paste may already be dry. Once done it should be quite dry and you can gently use a "Swiffer" dusting cloth and remove the excess powder from the card. Georgia then used a fun see-through bow and pretty pin to embellish this GEORGIA-ous card.

Now don't forget to visit the rest of the team this week to discover what their take is on "the holidays in a hurry". I am always amazed at how wonderful this team is when faced with a challenge:

Thursday, November 28, 2013

Happy Thanksgiving Everyone!

This Thanksgiving I am taking time to thank several people. I want to THANK (in a very big way) Pam Hornschu for posting for me this past month. I am truly thankful to have such a supportive friend and creative designer as the head of our team. And of course a special thanks to Linda Neff for being our guest designer during our Beacon Adhesive promo this month.

As you can see by the picture above, my main focus has been elsewhere. Our daughter was married November 17 near Zion National Park, Utah and I spent the past month doing creative projects for that occasion. Speaking of Beacon adhesives I highly recommend the Gem Tac glue for gluing acorn caps back onto acorns. Really great glue...I often use it in situations where I need something I can trust! I drilled over two hundred acorns and tied them with ribbon for napkin holders and during the drilling process quite a few of the caps came off...thank goodness for Beacon. A big thanks to their marketing team for sending glues to our team to use in our creations.

I also want to thank all of the people who have been posting to our blog challenge this past year. We have some very dedicated followers over the years and I love seeing what you have have been creating. I consider myself fortunate to have such dedicated followers and team members. Again thanks!


Pam Hornschu offered to do one more post for me, but I thought I could get at least one Dreamweaver creation done this month, but I lied ...just couldn't do it, so I found a card (yes, not even a home decor project) that I posted recently where I used Beacon's Gem Tac glue as an adhesive for "GEMS"....I use this glue all the time for putting gems onto projects. The wonderful thing about this glue is that you can actually use it for a variety of other things as well. It is a white glue but dries clear. So if you have applied excess it will just show clear underneath your gems. 

This creation began with the Dreamweaver Glossy Green Embossing paste (DGGP)...I paste-embossed it onto the vintage decor stencil (LX7022) and then sprinkled it with different colors of microfine Art Institute glitter. Once this was dry I put droplets of the glue onto the dots in the design and attached the gems. But it also came in handy for the next part of this design. I squirted dollops of the Gem Tack glue onto the leaves and used a toothpick to move the glue to within a 1/16th of an inch of the design and then sprinkled on Art Glitter's Nutmeg colored glitter. Then repeated on the central leaves using Art Glitter Chartreuse colored glitter....and finally the flower or pod was done with Pumpkin colored glitter.  Adding this glue and glitter embellishing really added triple dimension to the piece. It did take awhile for the glue to dry...maybe two or three hours because I wanted it to be dimensional, but the results were so smashing that it was worth the wait. I tied up a scrumptious May Arts ribbon for a finishing accent and there it is a new design to share. I will be teaching this card with more of a Christmas flair at Stamping Details in the San Diego area next month, perhaps I will get to meet some of you personally. 

Now don't forget to visit the team this week and see some wonderful creations. And if you would like to join our challenge click HERE to see how it is done. Next month we begin a new challenge and of course we love to have your projects added below. This month's winner will be announced next week but you have a few more days to post.


Thursday, November 21, 2013

Thankful for Holiday Celebrations and YOU!


Pam here again. Just having too much fun to let Lynell take over the reins. Lol. Actually, just trying to help lighten the load for our Stencil Queen.

Today's project once again features the Oak Leaves stencil, and could easily be an addition to the table runner from two weeks ago. Every other flag in the banner has the design ink stenciled on it as well as a portion of music sheet. The others have a portion of some beautiful fall paper. All the flags have a bit of Stampendous Embossing Enamels "Fran•táged" onto the edges and tips, and a textured fringe of burlap adhered with Beacon FabriTac. I had some chipboard letters glittered in gold and copper that spell out "Give Thanks", an expression that is actually perfect every day, but particularly so here in the USA where we are preparing to celebrate Thanksgiving Day.


Speaking of thanks, we really want to let you know that we appreciate our followers, and especially those who play along with our monthly challenges. This month is "Holiday Celebrations" with 
emphasis on home decor and gift items. Just link your creations to the linkytool at the bottom. Not sure how? Just follow the info HERE.

Here's the list of this week's Dream Team members that are posting as well as this our wonderful guest designer, Linda Neff. Please show them some love with your comments!


Thursday, November 14, 2013

Dreamweaver, Beacon Adhesives, and the Case of the Sticky Fingers!

Yes, it's Pam again! Lynell is still quite busy in preparations for her daughter's wedding, so I'm taking over the blog once again.

First of all, let's take care of announcing the winner of our hop featuring Ranger Distress Paints last week. If any of you missed it, you can go back in time and review it by clicking HERE. Our big winner is SANDI LOU! Congratulations! Please send an email to lynell@dreamweaverstencils.com with your address, and your package of five Ranger/Tim Holtz Distress Paints and five Dreamweaver Stencils will be on their way to you!

For the month of November we have two exciting events going on. First, our fabulous Guest Designer for this month is Linda Neff. Secondly, we're featuring Beacon Adhesives all of this month. They've always been so generous in providing product for our team, classes, etc., so we want to give them a huge thanks! They have an amazing line of products which you can find HERE.

Both of these events are perfect considering our challenge this month is Holiday Celebrations...with an emphasis on home decor and gift projects. Here's what I've come up with:

So, you're probably thinking, "Why did Pam create this as a holiday project? It looks Hawaiian!". Well, this is the perfect gift or home decor item to wish anyone a Mele Kalikimaka!

I had purchased this shadow box with the shell inside on clearance at Target. I carefully removed the shell and stenciled the background with the Dreamweaver Hawaiian Islands and Dogwood Pattern using Vintage and Leather Mixed Media inks from Clearsnap and a large stencil brush. I also applied the Dogwood design around the outside of the frame with Rich Cocoa Memento ink from Tsukineko. As for the lei, I stenciled the design from the Season's Aloha Wreath on white tissue paper, adding color with various Memento inks, and outlining with an extra fine brown liner pen. I stenciled the Aloha portion on tissue as well, but left off the "season's" as I wanted this to be an every day decor item. I tore the pieces around the edges, and applied them over the shell using Beacon Fast Finish underneath and over the top. The tissue pretty much disappears, leaving just the colorful design. When all was dry, I attached the shell to the inside with a thick piece of foam and some Beacon FabriTac.

Remember, we really want you to play along with us each month! So link your creations this month using the linkytool at the bottom of this post, following these directions. You could be the randomly selected winner at the end of the month receiving the stencil of your choice!

Meanwhile, for more inspiration, check out the creative genius of our Dream Team and our wonderful Guest Designer: