Friday, August 2, 2013

Stampendous and Dreamweaver Summertime Fun Collaboration HOP DAY!


It's fun in the sun time again with another collaboration between Stampendous and Dreamweaver Stencils! We've been playing together all of this week, with today culminating in a fabulous hop on, featuring a slew of amazing talent from both teams, and of course...prizes!!!

Two prize packages will be given away for the comments left on posts Monday-Thursday, July 29th - August 1st, and one prize will be given away for comments left on the hop day, Friday, August 2nd. Winners will be selected randomly and announced Thursday, August 8th. (Note: USA addresses only, please, due to shipping costs.) Here's what you could win:


Stampendous Surfer and Sandcastle Kiddos • Dreamweaver Hot Air Balloon, Ice Cream Cones, Summer, Mosaic Swirls, Bird Words, and Sandcastle stencils


I am an aqua maniac and just could not resist an ocean scene for my final creation for this summertime hop. Turtles are a big part of the good luck traditions and aloha spirit on the Hawaiian islands and today is a thank you card to the Stampendous and Dreamweaver teams for being so supportive this week.


I paste-embossed the turtle stencil (LM179) with Pearlescent Embossing Paste (DPP), also the Thank You (LG691) and the ocean floor were done with the same. The bubbles were done with the holes of Picasso (LL332)...I just taped off all the curves and other odd shaped holes and what was left were great circles for the air bubbles. Next came the Molten Magic technique (which was a happy technique creation by Stampendous design team member Jennifer Dove). This is achieved by sprinkling the wet paste with Metallic F/X colors (Goldfinch, Glacier Lake and Moonstone) and also some of the Stampendous Encrusted Jewel Teal Kit (EJK06), then heating it all while wet for a result of bubbling lava-like texture. The ocean floor was sculpted with about 1/8" to 1/4" of paste and then shells, sea glass and some of the larger mica powders from the Encrusted Jewel Teal kit were set into this wet paste for the final touch. I am really loving these crusty sparklers by Stampendous.

Now, hop on over to the next in line. Don't forget to leave some love for a chance to win, and just 'cuz it's nice!


If you are interested in attending a Dreamweaver stencils technique retreat in North Carolina scroll down or click HERE for more information.

Thursday, August 1, 2013

A Dreamweaver Stencils Retreat/Autumn in Black Mountain, NC

Learn Faux Cloisonné in the mountains of North Carolina

Dreamweaver Stencils is traveling to North Carolina this Fall for a two day retreat. I can't think of a more beautiful location in which to create!

Set aside October 12 and 13 on your calendar and join us at the Red House Studio and Gallery in Black Mountain, NC.


Learn multiple techniques to be used with your metal stencils...Faux Cloisonné, Ceramic Tile, Resist Techniques, Embossing Paste tips and the list goes on.


Registration information will be posted the end of August. 


To get on a list and for more information email: lynell@dreamweaverstencils.com 

Stampendous and Dreamweaver, Summertime Fun Collaboration, Day Four!

For those of you playing along with our monthly challenge, I'll be announcing the winner for the month of July below this post. If you haven't played along with us before...come join the fun! Our challenge for the month of August begins next week and features "Christmas in August".

It's fun in the sun time again with another collaboration between Stampendous and Dreamweaver Stencils! We'll be playing together all of this week, with a fabulous hop on Friday, August 2nd, featuring a slew of amazing talent from both teams, and of course...prizes!!!

Two prize packages will be given away for the comments left on posts Monday-Thursday, July 29th - August 1st, and one prize will be given away for comments left on the hop day, Friday, August 2nd. Winners will be selected randomly and announced Thursday, August 8th. (Note: USA addresses only, please, due to shipping costs.) Here's what you could win:


Stampendous Surfer and Sandcastle Kiddos • Dreamweaver Hot Air Balloon, Ice Cream Cones, Summer, Mosaic Swirls, Bird Words, and Sandcastle stencils


OK...I am back on track with summer designs after my detour of my Autumn creation (hehee...gotta love those Indian Summer days). This is the time of year that we begin releasing our new designs from the summer CHA show and my design team sent me packets of wonderful creations to showcase our stencils. Louise Healy made a card using the kitty face that was such an inspiration to me. Thank you Louise...although I didn't CASE your card you inspired me to use the same stencils with the Stampendous stamp seen below. Really appreciate all of the team's work when we are in "crunch time"...again thanks for being so supportive!


I began by stamping the Stampendous Agapanthus clear stamp (SSC1111) several times onto a bright green paper using a watermark type of ink, then sprinkled it with the fine teal embossing powder from the Encrusted jewel teal kit (EJK06), heated it and then spritzed the entire area with Blue Lagoon Memories Mist (MM20) and wiped it off of the Agapanthus immediately. This gave the floral design a bright almost florescent appearance. The Purrr-fect Day sentiment (LG741) and the new kitty face stencil (LS1014) were then paste-embossed with the Matte Yellow Embossing Paste (DMYP) onto the agapanthus. My plan is to send this card to the random challenge winner for the month of July!

Now, hop on over to the next in line. Don't forget to leave some love for a chance to win, and just 'cuz it's nice!


Now for the winner of our July Summertime challenge...Theresa Young for her Perfect Day creation which you can find HERE! Congrats, Theresa! Send an email to lynell@dreamweaverstencils.com with your address and the name of the stencil that you'd like to have! You can find the entire selection on the Stencil with Style site!

Wednesday, July 31, 2013

Summertime, Sparklers, and S'more with Dreamweaver and Stampendous, Day Three!


It's fun in the sun time again with another collaboration between Stampendous and Dreamweaver Stencils! We'll be playing together all of this week, with a fabulous hop on Friday, August 2nd, featuring a slew of amazing talent from both teams, and of course...prizes!!!

Two prize packages will be given away for the comments left on posts Monday-Thursday, July 29th - August 1st, and one prize will be given away for comments left on the hop day, Friday, August 2nd. Winners will be selected randomly and announced Thursday, August 8th. (Note: USA addresses only, please, due to shipping costs.) Here's what you could win:


Stampendous Surfer and Sandcastle Kiddos • Dreamweaver Hot Air Balloon, Ice Cream Cones, Summer, Mosaic Swirls, Bird Words, and Sandcastle stencils


Here's what I created...OK...not exactly Summertime Fun, but if I don't get a headstart on Autumn/Indian Summer I could be in trouble presenting new stencils to the world. We will be heading to Art'n Soul in Olympia WA for a Zentangle demonstration by Wayne on the 10th of August. Then off to the UK in September for two retailer's workshops starting September 8th. Next in October we will be going to Asheville NC for a stencil retreat (hoping to see some Fall colors while there), we would love to prep stencilers for the next step of doing Teacher's Certification with Dreamweaver products. More about this very soon...stay in tune on Facebook and here for more information!

The re-released acorn and oak leaves is now on a larger stencil size ...(LG754). I paste-embossed it with the Copper Embossing Paste (DCP) and while it was wet I sprinkled it with the Stampendous Encrusted Jewel Bronze Kit (EJK07) and some of the metallic F/X, (Goldfinch, Kimono Red and Nouveau Orange). These colors came together for a beautiful Indian Summer/Autumn look. The Fall season will be upon us before we know it. The sentiment, Merci (LS1011), was paste-embossed with Gold Embossing Paste (DGP). I am really loving working with the Stampendous "Frantage" powders...they are just gorgeous. A special thank you to the Stampendous team this week, who are working in a very big way to make Dreamweaver look GREAT! Thank you Laura Weed and Pam Hornschu for working behind the scenes to make this all happen.

Now, hop on over to the next in line. Don't forget to leave some love for a chance to win, and just 'cuz it's nice!


Tuesday, July 30, 2013

Summertime, Sparklers, and S'more with Dreamweaver and Stampendous, Day Two!


It's fun in the sun time again with another collaboration between Stampendous and Dreamweaver Stencils! We'll be playing together all of this week, with a fabulous hop on Friday, August 2nd, featuring a slew of amazing talent from both teams, and of course...prizes!!!

Two prize packages will be given away for the comments left on posts Monday-Thursday, July 29th - August 1st, and one prize will be given away for comments left on the hop day, Friday, August 2nd. Winners will be selected randomly and announced Thursday, August 8th. (Note: USA addresses only, please, due to shipping costs.) Here's what you could win:

Stampendous Surfer and Sandcastle Kiddos • Dreamweaver Hot Air Balloon, Ice Cream Cones, Summer, Mosaic Swirls, Bird Words, and Sandcastle stencils


Here's what I created:

This card is actually a collaboration with Pam Hornschu who is the fearless leader of our Dream Team. Pam worked "in house" for Stampendous for six years and knows all the ins and outs of all the wonderful things they sell. While I enjoy getting involved in the design process of a hop like this, I just don't have time to do it all...so she encouraged me to use a couple of finished pieces that she had stamped and colored with Copic markers and the two pears you see here titled "pear blossom" (459005) is one of the things she shared with me. (Thank you Pam for making my life easier.) I placed our pear stencil (LL563) on top of her colored pair of pears and traced it with a pencil, then cut it out. The turquoise pear (LL563) in the background was stenciled with teal pigment ink onto turquoise cardstock. The edges of the traced and cut piece were edged with pigment ink by sliding it on the edge of the pigment ink pad and sprinkled with teal embossing powder from the Encrusted Jewel Teal Kit (EJK06), then heated and mounted onto the turquoise stenciled pear card. The window was created by tracing the 6-paned window grid stencil (LJ812) with a pencil onto brown card stock...then cut the windows out with a craft knife and back the window with acetate.  The background was "Frantaged" with the  Encrusted Jewel Teal Kit (EJK06) and the window was placed on top and mounted.

Now, hop on over to the next in line. Don't forget to leave some love for a chance to win, and just 'cuz it's nice!
Dream It Up! (you're here)

Monday, July 29, 2013

Sparklers, S'mores and Summertime Fun with Stampendous and Dreamweaver


It's fun in the sun time again with another collaboration between Stampendous and Dreamweaver Stencils! We'll be playing together all of this week, with a fabulous hop on Friday, August 2nd, featuring a slew of amazing talent from both teams, and of course...prizes!!!

Two prize packages will be given away for the comments left on posts Monday-Thursday, July 29th - August 1st, and one prize will be given away for comments left on the hop day, Friday, August 2nd. Winners will be selected randomly and announced Thursday, August 8th. (Note: USA addresses only, please, due to shipping costs.) Here's what you could win:

Stampendous Surfer and Sandcastle Kiddos • Dreamweaver Hot Air Balloon, Ice Cream Cones, Summer, Mosaic Swirls, Bird Words, and Sandcastle stencils


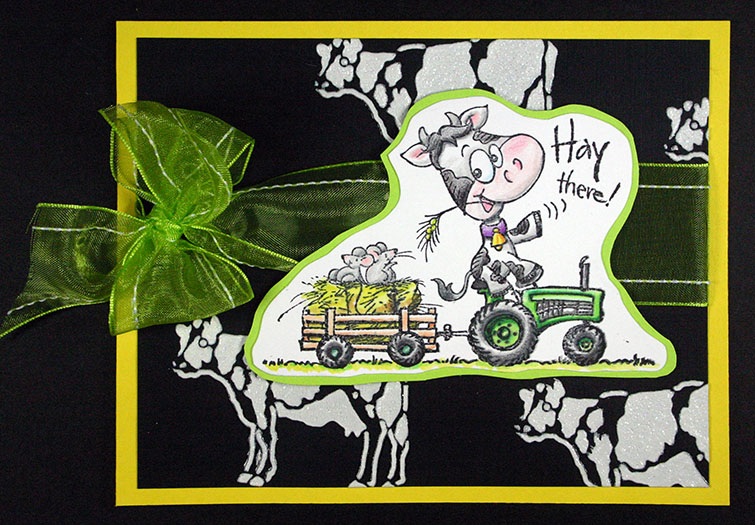
Stampendous Stamp, Dreamweaver Cow LM191 and May Arts ribbon

My creation today is with this fun Stampendous cow stamp..."Hay There"! Stamped on cardstock and colored with color pencils. In the background is Dreamweaver's cow stencil (LM191) paste-embossed several times on black cardstock with Dreamweaver Glossy White Embossing Paste (DGWP). While the paste was still wet I sprinkled it with the Stampendous Crystal Embossing Powder (EP050R) and then when it was almost dry I heated it with a heat gun and it bubbled the paste just a bit for a sparkling good time.

Now, hop on over to the next in line. Don't forget to leave some love for a chance to win, and just 'cuz it's nice!

Dream It Up! (you're here)


On Thursday come back as we will announce July's random winner for this month's summertime challenge. If you would still like to join our July challenge we still have a couple days left in July, so link up to our linky tool below:

Thursday, July 25, 2013

Thursday's Dream Schemes: Summertime, Sparklers and S'mores/Challenge


It was hotter than hot yesterday and I was out watering the garden when a beautiful dragonfly hovered near the swimming pool. They are so amazing and several that I've seen lately are just gigantic. But they always inspire me to create, so here it is...Faux Ceramic Tile. Don't forget to join us this month for all things summertime, also follow the design team list below to meet Wendy Price our guest designer this month and also see what the team has been creating. We are off at CHA as you read this... so you may be seeing new stencil designs on the blog this week.

This has been one of my favorite techniques for some time now and is actually quite simple as well. Just follow these steps:

1. Dry emboss a piece of 80# card stock through the embossing machine using the diamond grid stencil (LJ882).

2. Reposition the tile stencil onto the embossed area of the card with removable tape. Next, position the decorative corner flourish (LJ919) on top of the tile stencil....also using removable tape.

3. Stencil this decorative stencil with small stencil brushes and permanent blue ink and repeat the process with the dragonfly stencil (LM193), too. Once you have finished stenciling, if the ink is not quite dry, remove the grid stencil and heat the stenciled images with a heat gun for a couple of minutes to set the ink.

4. Clean off the grid stencil so it doesn't have any ink on it. This is important in the next step so that your background doesn't get color smeared on it. 

5. Reposition the grid stencil onto the embossed tile and use the jumbo dauber to systematically apply clear Watermark ink all over the stenciled tile.

6. Remove the tile stencil immediately and sprinkle the surface with  clear embossing powder. Shake off the excess and, if you have any powder sprinkles around the edges, brush them off with a soft stencil brush. If you have any powder in the grout lines remove it with the  small end of an embossing tool.

7. Heat the powder until it melts using a heat gun. I like to start by heating under the paper and then as it warms move to the top of the paper. This helps keep the powder from blowing off. 

There are many different thicknesses of clear embossing powder that can be used. However, I have discovered that beginners do best with regular clear powder and, as their skill level increases they often choose a thicker powder.

I wonder what the Dream Team is up to this week with their summer challenge...let's go see!