Monday, July 21, 2014

You Are My Sunshine (TUTORIAL...at last)


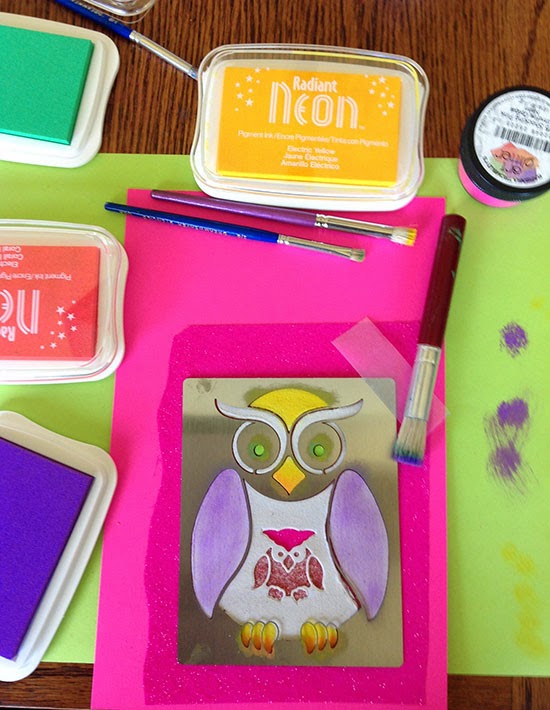
This is owl card #2, she is done with Punk Pink Art Glitter and glued onto a sticky paper that was glittered with Lemon Zest Art Glitter. Some of the pictures in the tutorial are done with a different glitter colorway but the techniques are the same. 
My internet was down most of Sunday and is super slow this evening. My provider said, "there are outages and they are working on them". This card was very involved and really needed a picture tutorial so I am a little late getting it up and running but here it is...FINALLY! I actually worked on this on and off for a couple of hours and my card #1 had a few flaws, so this is actually owl #2 card. When I finally finished her (and baby) I showed it to Wayne and his comment was..."that sure is bright"! And I said, "Good, because I am titling this...YOU ARE MY SUNSHINE". By the way, I know that owls lay eggs and aren't actually pregnant like I'm portraying this owl...but I am making this for a friend who is...so I'm just sayin' I do know my ornithology and physiology. lol! Also I wanted to thank Louise Healy, who happened to say something during a recent chat that gave the idea for this card...I honestly can't remember what she said but I know it was influential. Anyway, if your are reading this Louise...thanks!

Leaving me a comment each day this week will increase your chances to win the new owl die set ...which you can view on yesterday's post. There will be two winners. I want to thank those of you who are leaving me comments with inspiration and ideas and leaving such interesting comments ...of course I love that some of you are stopping by just to say hi!  Christina DorĂ© gave me the suggestion of using the owls with some baby prints and I love that idea. Am hoping to work on that this week. Also a suggestion of graduation was great and Halloween is a really good idea too. Thanks all! Don't forget that our challenge this month is Dreamweaver to die for and you don't have to use our dies...any die will do! We love to see your cards even if they don't follow the challenge that closely, we like to have you involved and each month we are picking two random winners and they get to choose any stencil they want.

I haven't had time do links yet, but will get that done after I walk and have breakfast...first things first ;)

Materials:

Dreamweaver Embossing Paste (original/regular)
DG751-Nested Owl set (the large owl shape and the tiny owl)
MPDS-Mounting Paper that is sticky on both sides


I used "Imagine Crafts" Neon ink pads which we used a couple of weeks ago when we did a blog hop with their team. So that is the pigment ink that I used on the regular Dreamweaver Embossing Paste for color. I used Art Glitter's "Lemon Drop" transparent glitter and "Punk Pink" opaque glitter on the sticky paper for the die cut owl.

TUTORIAL:
Cut the owl die shape out of the mounting paper that is sticky on both sides and save the frame piece to use later.


Remove the release or backing paper from one side only and cover with the opaque red or Punk Pink Opaque Ultrafine Gitter from Art Glitter. Rub the glitter onto the sticky paper.
Use the LG751 Large Owl Stencil and paste emboss with the regular Dreamweaver Embossing Paste (DEP). But to place the stencil is difficult to align, so I taped the frame from the original cut out onto the stencil...you need to act like this is just part of the stencil. Then place the glittered owl shape face down into this cut out/stencil for perfect alignment. BUT don't tape it or it will be difficult to remove when you are finished paste-embossing.
Before you do anything else...take a couple of pieces of removable tape and roll them...then adhere them to the back of the owl. This will ensure that the owl is anchored on the paper when you remove the stencil/frame after the paste-embossing process. Now turn the owl over onto a piece of scrap paper and tape down on all four sides. Apply the Dreamweaver Embossing Paste to the Paste Spreader using the smaller palette knife (DPK).
Paste-emboss with the spreader with just one sweep of the spreader if possible and then remove the stencil/frame with the hinge technique. This is where that rolled tape on the backing of the owl helps...because when you lift the stencil the owl will then stay on the paper and the frame and stencil will be lifted away.

Remove the frame from the stencil and let the paste-embossed owl dry for at least a half an hour. This is where and old warming pan or electirc skillet or griddle comes in handy. I put it on the lowest heat setting and let it get very dry. You are going to put this pasted piece through the die cutting machine, so you don't want the paste to be damp or she might stick to the acrylic plates during the next step.
Place the smallest owl die in the middle of the VERY dry paste-embossed image. When I run this through my embossing machine I add an extra shim because I really want this to cut through the extra thickness of the embossing paste PLUS the glittered sticky paper and through the release paper on the back of the glittered owl.
This reverts back to my owl #1 card where I had used red glitter and glued the owl onto a piece of hot pink glittered paper, but the process is the same....NOW you adjust the stencil onto the paste-embossed image and stencil with a variety of small stencil brushes using the NEON pigment inks from Tsukineko/Imagine Crafts. On my #2 owl that is shown at the top I placed the hot pink glittered owl onto a Lemon Zest glittered background.

The wings were stenciled a light color of purple. Then while the owl stencil is still in place I used the LG629 scales background stencil on top and stenciled the wings with more purple ink to create a feathered look.

The tag "you are my sunshine" was an outline font that I printed off the computer with the help of the Wayne (...the fontmeister) and I colored it in with Sakura florescent pens.

This card was extra fun...sending to a pregnant friend who has been on her back in bed for many days. I haven't been there, but I can imagine...

12 comments:

ionabunny said...

I love the neon colours. I am very into hot pink at the moment so this rang my happy bell. Love the idea of this as a expectant mother card.

Unknown said...

What a bright, fun card. I wouldn't have thought of pasting over the top of the glitter to leave just the outline. The photo's made the process easier to understand!

Sandi Lou said...

How about die cutting these cute little owls out of felt or thin foam to make finger puppets? Using different colors, kids could put together their own personal combinations. Trace around the die and cut out for the solid background and then glue on the chosen die cut pieces for body parts.

Carol McCready said...

Very fun card and great tutorial. Thank you for sharing.

Viki Banaszak said...

I think that will make a wonderful new mom card. It is so pretty.

Janice K said...

WOW! Super colours and a lovely card that is sure to make your friend smile. x

Louise said...

That IS a bright and cheerful card! Your welcome, I have no idea what I said either, but I'm happy to be of service!

Jade said...

I love this card! How fun and clever.

Katie said...

This is a great idea for a baby card! I love how cute the little owl looks inside of its Mom. She will love it! And I love your idea for the wings too, very neat! Thanks for sharing.

Katie B.

CreativeJanine said...

I can see using this owl die for back-to-school items. Wouldn't it be great on little notebooks?

Unknown said...

Lovely card again today, love the background stencil used on the wings to give extra dimension.

Con said...

<3 It! thanks, -con

Post a Comment

Blog Archive