Tuesday, July 31, 2012

More Summertime Challenge Entries: YAY!!!

Here is a beautiful summer card done Stacey Rumsby. In her own words here is how she created this summertime card:


This card reminds me of my hometown in Lunenburg, Nova Scotia during the summer and watching all of the sailboats.  It is truly a "Summer" themed card for me.
The lighthouse and boats (stencil LM163) were sponged using daubers and inks with LOTS of masking in between different colours/sections. The water was created using translucent paste (DEPT) and adding a little reinker colour to create "water".  I also added a few touches of "white caps" on the water using White Paste (DEP) and applied it using a toothpick.  The clouds were created using white paste and stippling it on with a stipple brush to create some texture.  While wet, I sprinkled on some white glitter to give it a little shine ("the Silver Lining!").  The sky is lightly sponged with blue ink to take away from the bold white.  The seagulls were ever so carefully sponged on once the entire card was created to find just the right placement.  As an extra detail, I used a toothpick again and applied white paste to the waterline area of the rocks and to the waterline of the boats.  To take this card one step further, I envisioned this as a picture on a wall, so I added a frame.  I cut out the frame, applied crackle paste, let it dry.  Then I sprayed it with Tattered Angels Glimmer Mist followed by sponging the outside and inside edges with brown ink.  The lighthouse and bottom sailboat are raised up with a thin foam dimensional.  The frame was raised up with a thicker foam dimensional.

This second card also by Stacey:

And in her own words here is how she created the card:

I create an embossed paper background with the Swirl stencil (LJ890) and White Paste (DEP).  The butterfly was created using Tattered Angels Glimmer Mist and Chalkboard Mist, and also sponging on some further detail with ink.  The butterfly was cut out and raised with a foam dimensional so it was flying rather than sitting on a branch.

Thank you Stacey for joining our Summertime Fun Challenge...we know you have a busy life at Scrapbook Essentials BC. But we are loving getting so many talented Canadian cardmakers joining us this year.


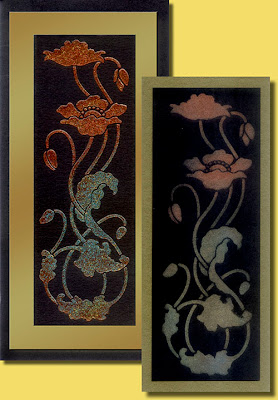


Summertime Poppies: Joining the Challenge

Submitted by Joy Hauck
Joy Hauck has joined us with this lovely Poppy card that was inspired by a recent visit to the UK. She wrote that the fields of poppies were breathtaking. She stenciled the poppy stencil (LL3023) with pigment ink and then paste-embossed it with the translucent embossing paste (DEPT) for a glossy and very vibrant finish. 


Love the shading with the piment inks and how the little black dots in the center are just like real poppies. (Did  you accomplish that with an ink pen Joy?)


Submitted by Dot Clark


And on the same day that Joy sent this beautiful card I received a packet of photos and cards from Dot Clark. Believe it or not she is from the UK and demonstrates for The Stamp Hut in Bury St. Edmonds, Suffolk. What a coincidence that she also sent a couple samples of the same poppy stencil that Joy did. One of the cards that I am posting for her was done with gold embossing paste (DGP)as a base and then she sprinkled it with glitter. The other poppy (to the right of the first one) was stenciled with clear ink or a glue pad and then the Metallic F/X or mica powders were stenciled on top of that base.


I hope to sort through some of the photos she sent and scan them to show here on the site. Dot teaches and demonstrates many different cardmaking techniques. So if you are ever in the UK (or if you already live there...lucky you) stop by The Stamp Hut to take a class or enjoy their store.


I have a couple more submissions to share, but they may not go up until tomorrow. So be sure to stop by again! And remember that Thursday we are starting our Christmas in August challenge. We have eleven new designs coming in and the Dream Team are going to tease you with new ideas and techniques. The bulk of our shipment is not due until mid August, but hope that you will visit your favorite retailer and let them know you want the latest designs.

Saturday, July 28, 2012

Joining the Challenge: Nathalie and Rose

 Nathalie Fournier decided that this swirly stencil (LJ896) would be the perfect background for her Copic marker artwork on the lovely ballerina you see here. 


She actually airbrushed through the stencil to create this dark blue detailed background. 


And in the "Felicitations" card below she used the toy pull (LM281) stencil and very simply paste-embossed it using the original embossing paste (DEP) at the bottom of the card. She emailed me telling me that this is one of the stencils she won from our challenge last month with the Art Glitter team. YAY!


Thank you Nathalie for joining our challenges!


 The third card in my post was done by Rose S. from Nova Scotia. She applied watercolors and radiant rain to watercolor paper (which was spritzed first with water to prepare the surface) as a base for the masks stencil (LL538), which she paste-embossed with matte black embossing paste (DMBP) and then sprinkled with mica powders while it was still wet. Thank you Rose fore joining our challenges!
Anyone can join our challenges...Nathalie and Rose emailed me their creations and I posted them. If you have your own blog just link your blog to mr. linky below. If you don't have a blog you could still win a challenge like Rose and Nathalie did recently by emailing me at:lynell@dreamweaverstencils.com


Here is a partial peek of the Season of Joy stencil which will be available for sale at your favorite Dreamweaver Stencil retailer in the month of August. And it is the stencil you could win if you join our challenge this month. Three more days left to win.


Thursday, July 26, 2012

Inspiring Challenges at Dreamweaver Stencils

Two things inspired my posting for today. These scrapbook pages by Laura Drahozal showcase a trip she and Steve made to Balboa Park in the San Diego CA area, which happens to be pretty close to my home base. Laura used the fish stencil (LG701) and embossed it on metal through her embossing machine, then she colorized the metal with alcohol inks and finished them off by cutting them out by hand. She paste-embossed the waterlily background stencil (LJ861) using regular embossing paste (DEP) and stenciled it with pigment inks then cut them out with alphabet dies through a die-cutting machine. Genius! Also she used the dragonfly/waterlily stencil (LM135) by paste-embossing it repeatedly on colored cardstock and then stenciled them with pigment inks and cut them out to attach in various places on the pages. The detail in these scrapbook pages make them a true work of art Laura. Well...that is the first reason I couldn't resist blogging about these summer fun pages.... And I know I often say this, but seeing the pages in person really makes a big difference. These are good pictures of the pages, but the 'in person' experience is even better! I used a card last week with the same fish stencil and it was gorgeous too, but isn't it amazing how different they look here?


Then the second reason I used these pages to blog about this week is because I just got back from Michigan and had an opportunity to stay with Laura and her hubbie, Steve....(who by the way is six foot six inches tall and just as fun loving as this scrapbook page pictures him to be!) while I taught in the lower peninsula of the state. Thank you Steve and Laura and Emma (the sweetest Collie you could ever hope to have for a bed partner...LOL!!!) for opening your home and hearth to me for the past few days. Can't wait to hear and see some scrapbook pages from your next vacation adventure to the Outer Banks of North Carolina. Have lots of fun you guys! This was such an inspiration for me to get some of my pages scrapbooked too.


You have a few more days to join us and post your creations for our challenge, we will post the two winners next week. All you have to do is link it here at the bottom of the page on mr. linky before August 1st. If you don't have a blog but would like to join the challenge, just email me your creation and I will blog it for you right here in fact I have one from Nathalie Fournier that I will post this weekend. My email is lynell@dreamweaverstencils.com


Remember there will be two winners of a new stencil which I have posted a sneak preview of at the end of this blog. One winner will be chosen for best use of Dreamweaver Products and the second winner is for best interpretation of the challenge.


Don't forget to see what the rest of the team has posted today by following my sidebar of the team on the right hand side of the blog.


This is just a portion of the stencil you could win this week!


Thursday, July 19, 2012

Summertime Fun! July's Monthly Challenge

If you want to know more about our monthly challenge scroll down to last week's post to find out more. You could win a stencil by joining the fun and posting one of your creations here on the Dreamweaver blog.


This month I have been soooo busy with business commitments that I am leaning on my design team for help with my weekly postings.  Last week the design team leader, Pam Hornschu, sent a creation. This week's beautiful ocean card which was done with the metallic leafing technique was created by my former sales rep. to New England, Theresa Winters. (Some of my sales reps are honorary design team members.) She is presently living close to the ocean in Florida and I think that maybe it feels like summertime there all year long. When I saw this card I thought of a beautiful swimming pool with mosaic tiles in the bottom and that is definitely an image I have of summer. Theresa is still keeping her fingers in the stenciling inks in spite of being in that summery climate. She stenciled this mosaic background design (LJ901) with soft colored inks onto a very smooth vellum. Then the carp stencil (LG701) was paste-embossed with copper metallic embossing paste (DCP). Once dry...the cleaned stencil was repositioned onto the fish and the Palette Stamp & Stick Glue (GSP) was daubed onto the image. The next step is important...remove the stencil and heat the glued image for about 30 sec. with a heat gun, keeping the gun moving so the paste does not bubble or burn. Then to make sure the image is "tacky" lay two fingers flat against the glued surface and lift. The whole paper should attach to your fingers as you try to lift it from the glued design. If the glue feels slick or gummy, you need to dry it more, then test it again.


Gently place the variegated green "leaf" (VGL) onto the now tacky embossed design. Tap the leaf firmly into place with a large stencil brush. Next, rub the brush bristles in a circular rouging motion, keeping the bristles flat against the "leafed" surface. This burnishing technique will remove all the excess gold leafing from the edges of the embossed image. Thanks for sending me this beautiful card Theresa!


I will be traveling for a few more days, but if any of  you would like me to post one of your creations that say "summertime fun  just email me at lynell@dreamweaverstencils.com and I will take care of it after the 23rd of July when I return. Or you can post one of your creations here on mr. linky to join our July challenge. To find out more about our challenge this month scroll down to last week's post to discover what you could win and how to do it.


Don't forget to follow the sidebar on the right and visit the design team's posting of this month's challenge...always inspiring for me.


Friday, July 13, 2012

Teaching in New England

Well a couple of days ago I blogged about my classes in Michigan that are coming up very soon and if you are interested there is still some availability there. Just scroll down a couple of days to the July 10 post to find out where.


In August Wayne and I will be traveling to Rhode Island where he is going to take the Zentangle Teacher Certification, so I am tagging along to do some teaching in New England. Many of you from that area have taken classes from Theresa Winters who has since moved to Florida. So I am moving around her old stomping grounds and teaching at some great stores while there. Here is a list of my teaching schedule and am hoping to meet some of you in one of my many classes.


This card in my post is a creation that I CASEd from my Montana sales rep. and design team member, Wendy Jordan. She has given me permission to use it in my upcoming classes. It will be slightly different for my teaching tour but you are going to learn many tips to make embossing paste and stenciling fun and simple. I will also be teaching the Molten Magic technique which Jennifer Dove, from Arizona has developed. (Thank you Jenn and Wendy for your inspiration. We'll be thinking about your creativity as we stencil away in New England.) 


Here are the stores I will be visiting:


Ink About It, Westford MA: Friday August 10 , Two Classes, Call the store for specific times, availability and cost. 978-392-0321

Absolutely Everything, Topsfield MA: Saturday August 11, Two Classes, Call the store for specific times, availability and cost. 978-887-6397

Stamp and Scrap Nest, Simsbury CT: Thursday August 16, Two Classes Call the store for specific times, availability and cost. 860-658-9023

Inspirations Arts and Crafts Supplies, Essex Jct. VT: Saturday August 18, Two Classes, Call the store for specific times, availability and cost. 802-876-7005

Beautiful Impressions, Westbrook CT: Sunday August 19, Three Classes, Call the store for specific times availability and cost. 860-399-8855


Don't forget to scroll down and read my last post about our July Challenge!

Thursday, July 12, 2012

INSPIRING CHALLENGES AND CLASSIC SUMMER

Last week we kicked off our monthly challenge with July's Summertime Fun! Every Thursday morning I love going from team member to team member's blogs to see what they have created. And team member Cherylynn Moser used the ice cream cone stencil (LM183)..if you haven't already done it you'll have to drop by her blog (click here) to see her creation from last week, because it inspired me to go through my team archives and find this card. I LOVE this stencil and of course as I am getting ready to head to CHA I have been packing like a fiend so haven't had a minute to spare to do a fun summer creation. So I decided to post a card that team member Pam Hornschu did some time ago with the same stencil. Let's hear it for classic summer stencils. YAY! 


Thanks Cherylynn for the inspiration and thanks Pam for all the great designwork you send our direction! 


Here in her own words is how Pam created this Classic Summer Creation:


The Ice-cream Cone stencil was run through my Big Shot to emboss the image. I replaced the stencil over the top and added shading and detail to the cones using chalks. Then I applied the embossing paste over the ice cream portions, but instead of smoothing the surface, I left it fluffy. Who wants flat ice-cream? When it was dry, I sponged Brilliance inks over the fluffy surface and applied glitter. The sentiment at the bottom was embossing pasted and sponged with the same Brilliance colors when dry. Don't you want a nice big bowl of frosty ice-cream right now? Mmmmm. Hope all of you are having a wonderful summer so far!


Now if you would like to join the challenge just create something that shouts "SUMMERTIME", then link up to mr. linky below and we will pop by and view your summer magic! If you don't have a blog but would like to join our fun, just email your design to me at: lynell@dreamweaverstencils.com and when I get back from CHA on the 23rd I will post it that week.


Here is a sneak peek of one of the stencils that we are presenting to the retailers at CHA Summer (our bi-yearly trade show). And you could win this stencil if you join our challenge. We are giving away two. A #1 prize to the person who best interprets the challenge and #2 winner for best use of Dreamweaver products. So see?....you don't even have to use Dreamweaver products (of course we are thrilled when you do.)


And don't forget to visit the other team member's blogs listed on the side bar for more summertime inspiration.


Tuesday, July 10, 2012

TEACHING IN MICHIGAN

Molten Magic with Metallic F/X Class 
Hi everyone! Just a note to let you know that I am teaching in Michigan on July 20-22 at three different stores. A couple of the classes are full, but some still have room. The new Molten Magic Technique Class was really popular on my West Coast Tour. So if you are in the vicinity I'd love to have you. Here is the list of stores and dates with their phone numbers, so call them to check availability:

My Craft Room, Troy MI - Friday July 20, Two Classes:  Call the store for times and cost 248-879-3360

Stampeddler Plus, Northville MI- Saturday July 21, Molten Magic Class: Call the store for times and cost 248-348-4446

Altered Art Addicts, Jackson MI- Sunday July 22, Megaworkshop: Call the store for times and cost 517-395-4450


Thursday, July 5, 2012

Summer is Upon Us!!! AND...we have a WINNER!

This month our creations will center around summertime fun in the sun. This has been an odd summer so far in Southern California. The days have been warm, but haven't been scorching. Whereas I talked to my friend Leesa at Creative Impressions in Colorado Springs and they have been in the middle of fires and ultra hot weather for days. My daughter Liz is now living in Salt Lake City and she said they are tied for the driest summer on record in Utah. So we know that the nation is HOT HOT HOT!!! So let's create some COOL cards for summertime fun!


The "Summer" stencil (LM294) sparkles with a transparent yellow ART GLITTER (lemon drop ultrafine neon) on top of the Dreamweaver Matte Yellow Embossing Paste (DMYP). I repeated the image four times very quickly by using my "power pasting " technique that is shown in my DVD (Tips & Tools) and then applied the glitter immediately to the wet paste. While it was drying I paste-embossed the sun stencil (LR502) onto a metallic turquoise paper using the same paste and glitter and after it was dry cut it out. The card was then assembled utilizing ribbon and double stick mounting tape. The plaid ribbon around the outer edge is from Creative Impressions and the other ribbons and trim are from a local big box store. The beautiful aqua paper that was used as a base to paste-emboss onto is Tsumugi paper from Hanko Designs. I have to say that it is one of my favorite papers to paste on. It recovers really well and doesn't seem to warp very much with the moisture.


Remember that if you would like to join the challenge this month link your creation to mr. linky below. If you don't have a blog you can email me a photo (lynell@dreamweaverstencils.com) of your creation and I'll post it for you on my blog. Of course you have to put up with me telling everyone how I thought you made the card...LOL! Point being... that you might want to send just a brief description of how you created your masterpiece. This past month we have been playing along with the Art Glitter Design Team and it has been soooo hard to choose winners...you all do lovely work, so for this last giveaway I am asking  the resident artist to choose the winner. He is very qualified, he has spent more than 25 years as an art director for a graphic art dept. and is my go-to guy for advice when I have a glitch in my own design skills. The winner of the last packet of stencils and glitter goes to Stacey Rumsby. So Stacey please email me the address where you would like the package mailed. YAY...beautiful job Stacey!!! Here is the picture of her card:
The stencil giveaway for next month is a new stencil that will be available in August at your local retailers. The final size is one of our LX stencils. We recently started manufacturing this size for people who want to run their stencils through the embossing machines and have a completed card size. This card falls under that category and will have a sentiment already in the design. This makes it much easier for those of you who have long Christmas card lists. Here is a teaser of just a piece of the stencil you can win:
Don't forget to visit the team this month to see what they are creating too!

Wednesday, July 4, 2012

A Little Snow on the 4th of July???

Happy 4th of July!!! I thought this was the most appropriate card for today created by Holly Brown for the Art Glitter challenge. Because much of the nation has been blistering hot...it gives us just a sneak preview of what's around the corner. SNOW! Besides I always admire those early birds who get a head start on their holiday greeting cards.


She did the double glitter technique and used two different colors of transparent glitter on this snowflake stencil (LL399) for her Season's Greetings creation.


This is the last day that we will be posting with the Art Glitter Team. And tomorrow we will post our winner for this past week.


If you are reading this on the 4th you could still post something by scrolling down to last Thursday's post and link onto mr. linky.


Next week we will begin a July challenge of posting "summertime fun". It could be a scrapbook page, a card, a 3-d project ...you name it ... just as long as it has to do with summertime! Remember, you do not have to use Dreamweaver products to play along with our challenge. Of course we like it when you do...but not required to win. Here is a sneak preview of the stencil you could win...(this is just a portion of the stencil):


Monday, July 2, 2012

Double Glitter Technique by Stacey Rumsby
This week we have been joined by Stacey Rumsby and Tiffany Smith doing the double glitter technique for our challenge with the Art Glitter team. Here are their beautiful cards: One thing that Stacey did with her card is she just did a portion of the butterfly stencil (LL591). And I love how she matched the glitter with the background papers. It never hurts to have several extra thank you cards handy.
The wedding card below by Tiffany is also double glittered...this time with the egrets stencil (LL546) and the background paper on which they are mounted is stenciled with the fern stencil (LM2006) and a soft green ink. Her embellishments are a crochéted flower with a paper rose in the center that has been tipped with just a touch of brown ink. Those embellishments really add a great handcrafted touch.

Double Glitter Technique by Tiffany Smith
Just scroll down to my last post to add one of your own creations to join our challenge on mr. linky. Or do like Tiffany and Stacey and email me lynell@dreamweaverstencils.com a photo of your work and I will add your creations here on my blog.


Blog Archive